5 Ways to fix Avast Service High CPU usage In 2021
Microsoft takes security very seriously in an ever-online world and has integrated several important tools within Windows 10 to keep users safe.
Since these tools are integrated into the OS, they do not hog resources.
However, third-party antivirus tools like Avast are resource-demanding as they perform several real-time operations like running background checks and cleaning threats.
While these operations are quite useful, Avast service high CPU usage becomes annoying if the service ends up consuming almost all of the CPU allocation.
Avast using too much CPU can prevent you from performing other tasks, especially the CPU-dependent ones.
There are several ways to solve this issue, so let’s take a look at some ways to troubleshoot this issue.
How to fix Avast service high CPU usage?
Before moving on to the solutions, make sure that Windows, the Avast client software, and virus definitions are updated to their latest version.
Many times, version mismatch can lead to additional operations running and hogging resources.
If you notice Avast using too much CPU even after updating everything to the latest version, move on to the following solutions.
Fix 1: Remove Avast real time components
Any task running real time operations can be heavy on resources.
In this case, Avast Cleanup and Behaviour Shield are reportedly the components most responsible for Avast taking up CPU and other resources.
The best course of action will be to uninstall this component of the antivirus software.
Follow these steps for the same:
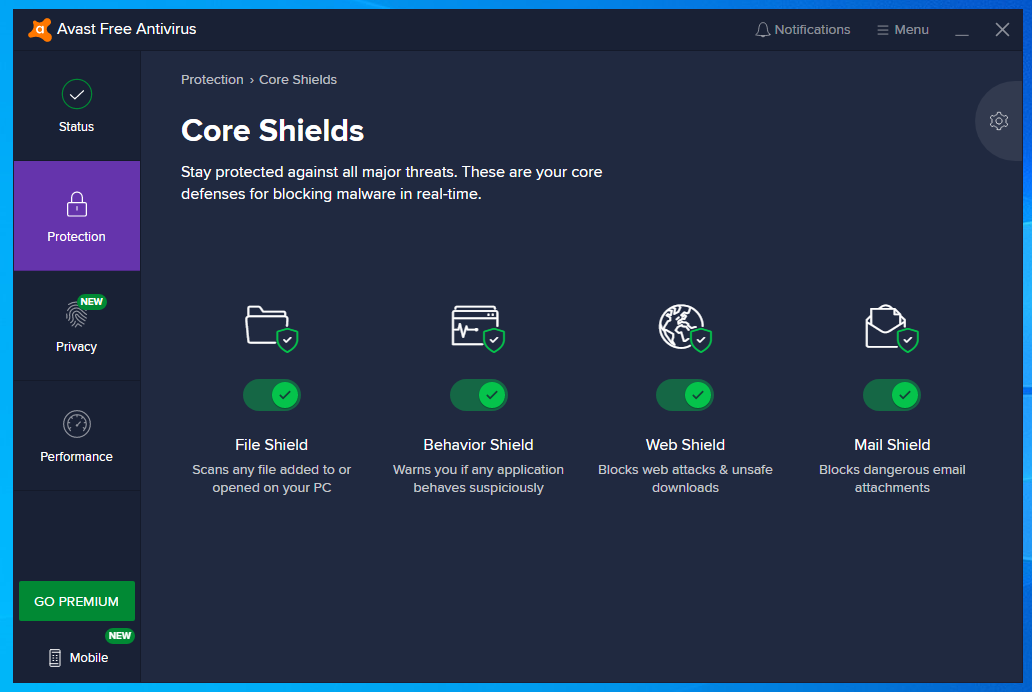
- Open the Avast UI from its system tray icon or the start menu.
- Navigate to the Core Shields tab under the Protection section of the Settings
- Here, select the shields that you might not need and disable them by unchecking the box next to them. You can also find the uninstall option for some shields in their arrow drop-down menus.
- Restart your PC to apply these changes.
Now, check the CPU usage as it should be down to its normal values.
If this resolves your error, you can try turning them back on and check if the CPU usage remains low.
Fix 2: Change the scan frequency
If your computer CPU cannot handle the real-time tasks, you can try reducing the scan frequency and limiting background checks.
While this may lead to some security issues, it will definitely prevent Avast service high CPU usage.
You can reduce the scan frequency from the command centre by adjusting a value in Avast’s configuration file. Here are the steps for the same:
- Launch a command prompt window with administrative privileges from the start menu.
- Use the change directory command to go to the Avast folder. Enter the following command to open its configuration file:
cd C:ProgramDataAVAST SoftwareAvast
C:ProgramDataAVAST SoftwareAvast> avast.ini
- In the notepad file that opens, locate, and modify the following value to adjust the scan frequency. If you cannot find this entry, add this line at last:
[GrimeFighter] : ScanFrequency=999
- Save the file and restart your computer.
Note that you will need to run the scans manually every once in a while to prevent security threats.
Fix 3: Avast screensaver scanning
In some cases, you might also see Avast using too much CPU if screensaver scans are running even though the screensaver has been turned off.
The tricky part of this error is that it does not show up on the Avast UI outright.
Here is how you can turn screensaver scanning off:
- Locate any random file on your computer and choose Scan selected items for viruses from the right-click context menu.
- A result window will appear, showing a list of running scans.
- Locate the Avast Screensaver Scan and turn it off by clicking the Stop button next to it.
- Open the task manager and check if the CPU usage has gone back to normal.
Fix 4: Remove unnecessary add-ons
Avast is bundled with several features installed during installation that help increase its functionality.
However, for most users, these shields do not perform any additional function and instead end up consuming computer resources for nothing.
To remove such components, you can modify the installation from Control Panel. Follow these steps:
- Open the Control Panel and navigate to the Programs section.
- From the list of installed applications, locate Avast and click on the Uninstall button at the top. This should launch the setup window.
- Click on the Modify or Change button depending on the installation version.
- In the next window, uncheck all the components that you do not require. However, keep the following ones checked:
- Behaviour shield
- Mail Shield
- File Shield
- Web Shield
- Click on the change button to modify the installation.
Fix 5: Repair Avast from Control panel
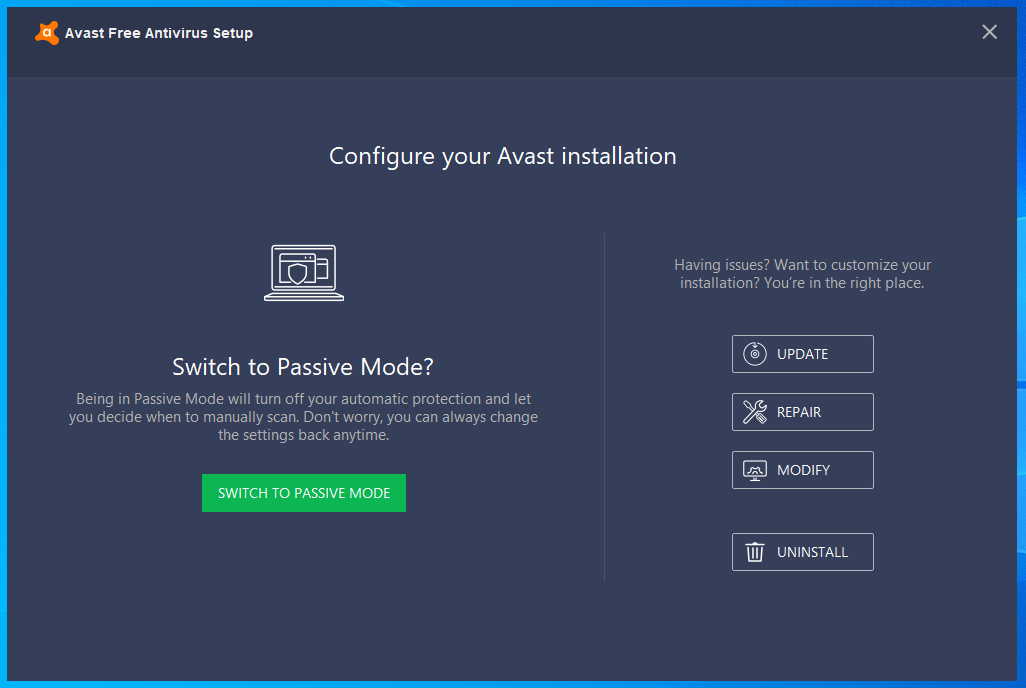
You can also try repairing the Avast client software from the control panel to repair any broken installation files that might be using up additional resources. Follow these steps for the same.
- Visit the Programs section of the control panel and locate Avast in the list of installed programs.
- Right click on Avast and select Uninstall from the context menu.
- In the setup window that opens, choose the Repair option.
- Click on Yes to confirm repairing the installation files.
- Restart your PC once the installer finishes repairing any broken files.
If none of these solutions mentioned above work in solving Avast Service high CPU usage, your only option is to reinstall the Avast client software from scratch.
A fresh installation will remove all the corrupt files and prevent your system from overheating due to additional resource consumption.
The post 5 Ways to fix Avast Service High CPU usage In 2021 appeared first on TechWorm.


